Showing posts with label 蛋糕 (Cake). Show all posts

Saturday, 13 June 2015

覆盆子蓝莓蛋糕 (Berry Cake)

转眼间小宝贝已经1岁了,时间过的真快啊!阿姨没什么可以送给你,只能亲手做个生日蛋糕给你... 祝你生日快乐!快高长大!


Frosting Ingredients:
  • 400g Whipping Cream 
  • Castor Sugar
Methods:
  1. Beat the whipping cream with sugar on high speed until stiff peaks.

Toppings/Fillings:
  • 350g Blueberries
  • 400g Raspberries
Cake Ingredients:
  • 5 Egg Yolks
  • 20g Castor Sugar
  • 120g Milk
  • 55g Melted Butter
  • 120g Cake Flour
  • 5 Egg Whites
  • 60g Castor Sugar
  • 1tsp Vanilla Powder
Methods:
  1. Preheat oven to 160C.
  2. Whisk egg yolks with sugar. Add in melted butter and milk, whisk together. Add in cake flour, whisk to combine.
  3. Beat egg whites with mixer until frothy. Add vanilla powder and sugar, beat until stiff peak.
  4. Whisk one-third of the egg white mixture into egg yolks batter. Gently fold to combine.
  5. Fold in the remaining egg white mixture to combine.
  6. Transfer batter to the bake pan. Bake for 45min to 1 hour.
  7. Let cool upside down for 1 hour.
  8. Once your cakes are fully cooled, cut cake horizontally into 2 layers using a sharp serrated knife. Place the bottom layer on a cake stand. Spread a thin layer of frosting over it. Cover with berries.
  9. Top with remaining cake layer. Spread with remaining whipped cream. 
  10. Decorate the top of the cake with raspberries and blueberries.

Wednesday, 30 July 2014

香蕉杯子蛋糕 (Banana Cupcake)

材料:
  • 165克 牛油(室温软化)
  • 120克 幼糖
  • 2汤匙 鲜奶
  • 3个 A蛋
  • 2个 Dole香蕉(压成泥状)
  • 150克 自发粉(过筛)
做法:
  1. 把牛油和糖打发。
  2. 逐个加入鸡蛋搅拌均匀。
  3. 再加入鲜奶和香蕉泥搅拌均匀。
  4. 拌入自发粉,倒入纸杯。
  5. 送入预热烤炉,180度烤25-30分钟。

Tuesday, 29 July 2014

杂果蛋糕 (Fruit Cake)


材料(1个7寸方模):
A) 530克 杂果,55克 核桃(切碎),170克 牛油,2克 豆蔻粉,235克 鲜奶,300克 糖
B) 335克 自发粉,2 鸡蛋

做法:
  1. 预热烤箱160度。
  2. 将所有材料A放入锅中,煮5分钟离火,放凉。
  3. 加入B拌匀,倒入已铺上油纸的模。
  4. 送入烤箱,160度烤40分钟,降温150度烤45分钟至金黄色即可。

Saturday, 19 July 2014

金枣烫面戚风蛋糕 (Kumquat Chiffon Cake)

材料:
  • 50克 牛奶
  • 50克 粟米油
  • 3个 蛋黄
  • 1汤匙 金枣酱
  • 60克 低筋面粉 + 10克 玉米粉 (过筛)
  • 3个 蛋白
  • 50克 幼糖 
做法:
  1. 把牛奶,金枣酱和粟米油混合,加热至40度,离火。
  2. 加入蛋黄拌匀。
  3. 再加入过筛的低筋面粉和玉米粉拌匀。
  4. 分3次把幼糖加入蛋白,打至硬性发泡。
  5. 把1/3的蛋白加入蛋黄糊中拌匀。
  6. 把面糊倒入剩余的蛋白中,轻轻拌匀。
  7. 倒入18cm的戚风模具,轻震一下。
  8. 送入预热烤箱最低层,155度烤35-40分钟。
  9. 出炉后立刻倒扣至冷才脱模。

Saturday, 12 July 2014

传统蒸鸡蛋糕 (Steamed Egg Cake)

材料:
  • 一碗 蛋
  • 一碗 糖(我用7分满的糖)
  • 一碗 自发面粉

做法:
  1. 先把蛋和糖放入碗内, 高速打至蛋液发大两倍成乳白色,再转低速打3分钟。
  2. 把面粉筛入打发的蛋液中。
  3. 用橡皮刮刀,轻轻的把自发粉面粉和蛋液拌匀。
  4. 沸水,用大火蒸40分钟。

Wednesday, 9 July 2014

烫面芋头戚风蛋糕 (Yam Chiffon Cake)

烫面芋头戚风蛋糕真的很不一样,带去公司请同事们吃,个个都吃到停不了口,还要边吃边赞好,真的很开心。自从老公开始减肥后,我都一直在忍,每天看到新的食谱都很想尝试,只可惜老公下定决心减肥后,没人再欣赏我的作品。忍了两个月,终于给我想到了两全其美的办法,我跟老公说,烘培和烹饪是我的兴趣,我真的不想放弃,他终于肯答应我,继续做烘培,带到公司请同事们吃。烫面戚风蛋糕真的很棒喔!

材料:
  • 50克 牛奶
  • 50克 粟米油
  • 3个 蛋黄
  • 1/2茶匙 芋头香精
  • 60克 低筋面粉 + 10克 玉米粉 (过筛)
  • 3个 蛋白
  • 50克 幼糖 
做法:
  1. 把牛奶和粟米油混合,加热至40度,离火。
  2. 加入蛋黄和香精拌匀。
  3. 再加入过筛的低筋面粉和玉米粉拌匀。
  4. 分3次把幼糖加入蛋白,打至硬性发泡。
  5. 把1/3的蛋白加入蛋黄糊中拌匀。
  6. 把面糊倒入剩余的蛋白中,轻轻拌匀。
  7. 倒入18cm的戚风模具,轻震一下。
  8. 送入预热烤箱最低层,155度烤35-40分钟。
  9. 出炉后立刻倒扣至冷才脱模。

Thursday, 3 July 2014

抹茶戚风小蛋糕 (Matcha Chiffon Cupcakes)

材料:
A:蛋白2个,2汤匙 幼糖
B:蛋黄2个,1汤匙 水
C:40克 低粉,5克 抹茶粉(过筛)

做法:
  1. 把(A)打至溼性发泡。
  2. 加入(B)轻轻搅匀。
  3. 将(C)加入拌匀。
  4. 将面糊倒入小纸杯内,约8分满。
  5. 预热烤箱至160度,烤20分钟。

Thursday, 12 June 2014

"无油"巧克力戚风小蛋糕 (Chocolate Chiffon Cupcakes)

生活太忙碌了,基本上都没办法抽出时间做烘培,但是又很想念戚风蛋糕,我唯有上网碰碰运气,希望可以找到简单又容易的戚风蛋糕食谱。今天很好运喔!给我找到了Jane部落格有戚风小蛋糕食谱,放工回家就马上开工一共做了4个小纸杯。这巧克力小蛋糕真的很好吃,浓浓的巧克力味,又不会甜,很赞!


材料:
A:蛋白2个,2汤匙 幼糖,1/2 茶匙 柠檬汁(我没放)
B:蛋黄2个,1汤匙 水
C:35克 低粉,10克 可可粉(过筛)

做法:

  1. 把(A)打至溼性发泡。
  2. 加入(B)轻轻搅匀。
  3. 将(C)加入拌匀。
  4. 将面糊倒入小纸杯内,约8分满。
  5. 预热烤箱至160度,烤20分钟。
  6. 出炉后 倒扣在铁架上放凉即可。

Thursday, 30 January 2014

传统鸡蛋糕 (Traditional Steamed Egg Cake)


材料:

  • 一碗 蛋
  • 一碗 糖(我用7分满的糖)
  • 一碗 自发面粉
  • 少许 粗糖

做法:

  1. 先把蛋和糖放入碗内, 高速打至蛋液发大两倍成乳白色,再转低速打3分钟。
  2. 把自发面粉筛入打发的蛋液中。
  3. 用橡皮刮刀轻轻的, 把自发粉面粉和蛋液混合。
  4. 把面糊倒入垫有纸的蒸笼中,用粗糖撒个十字。
  5. 沸水,用大火蒸40分钟。

Monday, 6 January 2014

烫面巧克北海道蛋糕 (Chocolate Hokkaido Cake)


材料:
  • 粟米油 60g
  • 鲜奶 80g
  • 可可粉 20g
  • 特幼面粉 80g
  • 蛋黄 80g (4 egg yolks)
  • 蛋白 160g (4 egg whites)
  • 细砂糖 90g (我用70g)
做法:
  1. 将粟米油和鲜奶以小火隔水加热至沸腾后熄火,加入可可粉搅拌均匀。
  2. 然后加入蛋黄,搅匀后,加入过筛后的特幼粉,搅拌成可可面糊,待用。
  3. 将蛋白打出一些泡沫,然后分三次加入细砂糖打成中性或干性发泡。
  4. 把1/3的蛋白霜加到蛋黄糊中,搅拌均匀。
  5. 然后将蛋黄糊全部倒入剩余的蛋白霜中拌匀。
  6. 将拌好的面糊倒入纸杯里,8分满。放入预热后的烤箱,以120度20分钟,130度15分钟,150度10分钟的温度与时间烘烤至熟即可。

Friday, 3 January 2014

肉松蛋糕 (Meat Floss Slice)

在网络上徘徊了一阵子,看了一遍又一遍,就是在找着有什么特别的烘培可以做呢?翻着翻着终于给我找到了Jane的肉松蛋糕...甜的蛋糕吃得多,咸的还没试过。成品会是怎么样呢?一级棒!老公吃了一直赞好,他说他第一次吃到这么好吃的蛋糕。他还说如果每个星期都有一个肉松蛋糕就好... 好吃的东西常吃都会变不好吃,就等他想念这蛋糕时再做给他吃吧!


(Recipe Source: http://janechew.blogspot.com/2013/04/pork-floss-slice.html)

Ingredients:

  • 4 Egg Yolks, 15g Sugar, 60g Milk, 40g Oil, 80g Cake Flour, 20g Corn Flour
  • 4 Egg White, 40g Sugar
  • 5-6 tbsp Pork Floss
  • Some Spring Onion for garnishing (I used Aonori)
  • Some Mayonnaise (I used Japanese Sesame Sauce)


Method:
  1. Beat egg yolks with sugar. Add in oil and milk followed by flour and mix until a smooth consistency is achieved. Set it aside. 
  2. In another bowl, beat egg white until frothy. Add in sugar in three batches. Beat until soft peak.
  3. Fold the egg white mixture into yolk batter in three portions, doing it very gently and slowly taking care not to deflate the egg white.
  4. Pour the batter into swiss roll pan and using a scrapper, smoothen the batter. 
  5. Sprinkle pork floss and spring onion on top of the cake.Bake in preheat oven at 180C for 12 to 15 minutes. 
  6. Holding onto the baking paper, pull the cake out of the pan onto a cooling rack immediately. Peel down the sides of the baking paper carefully to let the heat dissipate.
  7. When cake has completely cooled down, cut the cake into half. Spread / sandwich cake with mayo and some pork floss if you wish. Cut into small pieces and served.

Sunday, 1 December 2013

提拉米苏 (Tiramisu)

老公生日做了这个蛋糕给他。刚从波德申度假回来,回到家都下午6点多了,好累啊!但我又很想为他做个生日蛋糕。于是就快手快脚的,10分钟内做好了一个提拉米苏蛋糕来为他庆祝生日!过去的10个生日,我是怎么帮他庆祝,都不记得啦!我想他也是一样...哈哈!我只希望未来不管有多少个10年,我同样能让他拥有一个简单及快快乐乐的生日。
Ingredients:
A)
  • 24 pcs Italian Ladyfinger Biscuits
  • 2 tbsp Cocoa Powder
B)
  • 250 g Mascarpone Cheese
  • 1 tbsp Vanilla Extract
  • 2 tbsp Icing Sugar
  • 2 tbsp Thickened Cream
C)
  • 3 tbsp Instant Coffee
  • 150 g Hot Water
  • 5 tbsp Coffee Liquor
Method:
  1. Put the mascarpone, sugar, vanilla, and thickened cream in a large bowl and whisk just until blended and smooth.
  2. Stir the coffee powder and hot water together in a bowl until blended. Mix with the coffee liquor.
  3. Dip the lady fingers in coffee syrup for a second and arrange the ladyfingers lined up together on the plate as a layer. Spread half of the mascarpone mixture evenly on top.
  4. Dip the remaining ladyfingers very quickly into the coffee and arrange to form one more layer. Spread the remaining mascarpone mixture on top.  Sprinkle generous amount of cocoa powder on the top of the cake. Chill it and then serve.
材料:
A)
  • 24个 手指饼干
  • 2汤匙 可可粉
B)
  • 250克 马斯卡彭奶酪
  • 1汤匙 云尼拉香精
  • 2汤匙 糖粉
  • 2汤匙 鲜忌廉(我没放)
C)
  • 3汤匙 即溶咖啡(我用Nescafe)
  • 150克 热水
  • 5汤匙 咖啡酒(可以用Kahlua或Baileys)
注: 5tbsp蛮重酒味,要中酒味,份量就减少一半

做法:
  1. 将B放入一个大碗里,用汤匙搅拌均匀,备用。
  2. 另一个碗,把即溶咖啡加热水,搅拌一下,再加入咖啡酒,搅拌均匀。
  3. 把手指饼干快速在咖啡液里浸湿后,排在盘上,用汤匙把一半(1)的奶酪糊,铺在 浸湿咖啡的饼干。
  4. 再叠上一层浸湿咖啡的饼干,铺上剩余的奶酪糊,撒上可可粉,放入冰箱冷藏后即可享用。

Thursday, 14 November 2013

蒸香蕉蛋糕 (Steamed Banana Cake)

今天第一次做蒸香蕉蛋糕,大胆改了食谱...虽知道每一次改食谱都很冒险,成功率就只剩下一半,不过家里材料不足,唯有赌一赌,希望会成功。蒸的过程,很忐忑不安,很担心会浪费掉整个蛋糕,40分钟挨了过去,我迫不及待的去翻开锅盖,好开心,蛋糕成功了!整个蛋糕都很松,最开心的是老公边吃边赞好吃。他最大的支持是整盘蛋糕都带完去公司和同事分享。说到食谱,我改了什么呢?我改了鸡蛋,用鲜奶来代替,一颗鸡蛋大概是60克,我就用数学乘除算法,改了鸡蛋和鲜奶的份量。

Ingredients:
  • 1 Egg (around 55g)
  • 115g milk
  • 90g sugar
  • 120g Corn oil
  • 210g Mashed Overripe Banana
  • 250g Self Raising Flour
Note: Egg + Milk total weight should be around 170g

Method:
  1. Mash bananas with a fork in a bowl and set aside. Sift the flour in another bowl.
  2. Use mixer or egg beater to beat the eggs and sugar until thick and pale yellow.
  3. Add in melted butter/oil, mix well using spatula.
  4. Add in mashed bananas.
  5. Fold in sifted flour mixture. 
  6. Prepare steamer in advance. Let the water boil before putting in the cake. Steam it at high heat for 35 to 45 minutes.

Sunday, 10 November 2013

烫面巧克力北海道蛋糕 (Chocolate Hokkaido Cake)


材料:

  • 粟米油 60g
  • 鲜奶 80g
  • 可可粉 20g
  • 特幼面粉 80g
  • 蛋黄 80g (4 egg yolks)
  • 蛋白 160g (4 egg whites)
  • 细砂糖 90g (70g)

做法:

  1. 将粟米油和鲜奶以小火隔水加热至沸腾后熄火,加入可可粉搅拌均匀。
  2. 然后加入蛋黄,搅匀后,加入过筛后的特幼粉,搅拌成可可面糊,待用。
  3. 将蛋白打出一些泡沫,然后分三次加入细砂糖打成中性或干性发泡。
  4. 把1/3的蛋白霜加到蛋黄糊中,搅拌均匀。然后将蛋黄糊全部倒入剩余的蛋白霜中拌匀。
  5. 将拌好的面糊倒入纸杯里,8分满。放入预热后的烤箱,以120度20分钟,130度15分钟,150度10分钟的温度与时间烘烤至熟即可。


Monday, 14 October 2013

班兰千层蛋糕 (Pandan Layer Cake)

时间过得真快...一年一年的过去,不知不觉地,我为家婆做了四个生日蛋糕,一年一个蛋糕,陪她老人家过生日。今年我特别忙碌,13号了,我都没察觉到,还以为下个星期才是家婆的生日,幸好有老公提醒我。忙了一整天,所剩的,就只有晚上的几个小时来做个生日蛋糕送给家婆,希望她会喜欢我的小小心意。祝她生日快乐!

(Recipe Source: http://luckyinn.blogspot.com/2013/07/pandan-layer-cake.html)

8寸班兰海绵蛋糕
材料A:
  • 5粒 蛋黄
  • 20g 细砂糖
  • 50g 鲜榨班兰汁
  • 70g 椰浆
  • 55g 粟米油
  • 120g 低筋面粉
材料B:
  • 5个 蛋白
  • 1/2tsp 塔塔粉
  • 60g 细砂糖
做法:
  1. 将材料A的幼糖加入蛋黄里搅拌,再依序加入粟米油、班兰汁及椰浆,搅拌均匀,再加入低筋面粉拌匀。
  2. 将材料B打发至硬性发泡。
  3. 将1/3的蛋白霜倒入蛋黄糊内,拌匀。
  4. 再加入剩余的蛋白霜,轻轻搅拌均匀。
  5. 将拌好的面糊,倒入烤模,放入预热烤箱以150度烘烤60分钟。
  6. 蛋糕出炉后,移至网架倒扣, 撕开4边蛋糕纸散热。
  7. 蛋糕冷却后,将蛋糕切成3片备用。
班兰酱
材料:
  • 480ml 浓椰浆
  • 400ml 班兰汁
  • 95g 幼糖
  • 1/2tsp 盐
  • 85g 绿豆粉(绿色的Hoen Kwe Flour)
  • 1tbsp 即溶燕菜粉
做法:
  1. 将绿豆粉,幼糖和菜燕粉一起搅匀, 再慢慢加入班兰汁搅至均匀。
  2. 加入其他剩余的材料混匀后,用慢火煮至浓稠及泡泡滚即可。
  3. 先将蛋糕模喷上少许水(这样蛋糕比较容易脱模)。
  4. 将1/4的班兰酱倒进模里(第一份,铺上一片蛋糕。
  5. 倒入第二份班兰酱,再铺上第2片蛋糕, 重复第三份班兰酱,再铺上第3片蛋糕。最后铺上第四份班兰酱。
  6. 蛋糕冷却后,放入冰箱冷藏至少个四小时,才脱模。

Sunday, 13 October 2013

草莓优格杯子蛋糕 (Strawberry Yogurt Cupcakes)


材料:
  • 2个 蛋白
  • 50克 幼糖
  • 2个 蛋黄
  • 15克 草莓优格
  • 15克 粟米油
  • 60克 低粉+1克 泡打粉 (过筛)
做法:
  1. 将蛋黄,优格和油拌好,备用。
  2. 蛋白快速的打至起泡后慢慢加入幼糖打至硬性发泡。
  3. 把1/3的蛋白霜和蛋黄糊拌匀,加入低粉拌匀。
  4. 最后分两次把2和3拌匀,倒入小杯子(7-8分满)。
  5. 放入预热烤箱,160°C烤20-30分钟。

Thursday, 10 October 2013

綠茶蛋糕卷 (Green Tea Swiss Roll)


(Recipe source: http://copycakekitchen.blogspot.com/2013/04/green-tea-swiss-roll-ab-30-its-tea-time.html?m=1)

Ingredients:
3 eggs yolk
20g castor sugar
1/8 tsp sugar
20g corn oil (I used canola oil)
60g milk
50g low protein flour
20g green tea powder
5g corn flour

3 eggs white
60g sugar
Filling
Red bean
100g whipping cream (whipped)

Method:
  1. Whisk eggs yolk and sugar until sugar dissolve.
  2. Add in corn oil and milk, combined well.
  3. Sift in all flour into egg mixture, stir to combine.
  4. In other bowl, beat egg white until foamy, gradually add sugar and continue to beat till soft peak form.
  5. Take 1/3 of egg white and use a hand whisk  to mix into egg yolk batter.
  6. Fold in the balance egg white with a spatula till well combine.
  7. Pour the batter into swiss roll tray lined with baking paper (ungreased). 
  8. Smooth the surface with scraper. Tap the tray to remove big bubbles.
  9. Bake in preheat oven at 170C for 25 minutes.
  10. Once the cake done, transfer the cake to wire rack. Leave to cool for 5 minutes.
  11. Invert the cake and gently remove the baking paper. 
  12. Spread evenly a layer of whipping cream over the sponge surface and follow by red beans paste on top. 
  13. Roll it up gently and tightly. Wrap and chill for 30 minutes or 1 hour.
Tips:
Snip off the other end of the cake at 45 degree angle. (for neatly attached at the end of rolling)
Cut 3 lines at the beginning of rolling point but the cake is still attached to each other.


Monday, 16 September 2013

柠檬蛋糕 (Lemon Loaf Cake)


Ingredients:
  • 125g butter (softened)
  • 1 cup castor sugar
  • 2 eggs
  • 185g self-raising flour (sifted)
  • 1/2 cup milk 
  • 1 large lemon (rind finely grated, juiced)
  • 1/2 cup castor sugar (Glaze)
Method:
  1. Preheat oven to 180°C. Grease a loaf pan.
  2. Using an electric mixer, cream butter and sugar until light and fluffy. 
  3. Add eggs, 1 at a time, beating well after each addition.
  4. Add half the flour and half the milk to egg mixture. Gently stir to combine. Fold in remaining flour, milk and lemon rind
  5. Spoon mixture into loaf pan. Bake for 45 to 50 minutes or until a skewer inserted into the centre comes out clean.
  6. Combine lemon juice and 1/2 cup sugar in saucepan. Stir and heat till sugar is dissolved. Spoon evenly over top of hot loaf. Stand in pan until cooled.

Monday, 9 September 2013

绿茶相思蛋糕 (Green Tea Ogura Cake)


Ingredients:
  • 70g Milk 
  • 40g Vegetable oil
  • 55g Cake flour
  • 4g Green Tea Powder 
  • 4 Egg yolks + 1 whole egg (60g each) 
  • 150g Egg white 
  • 1/4 tsp Cream of tartar 
  • 60g Sugar
Method:
  1. Line baking sheet at the bottom of an ungreased 7 inch square pan and preheat the oven to 160C with a tray of boiling water on the most bottom rack.
  2. Whisk egg yolks,and vegetable oil until frothy and add milk, mix well. Sift in flour and green tea powder, mix well set aside.
  3. Using an electric mixer, whisk egg white, cream of tartar and castor sugar till peak form (not stiff).
  4. Mix 1/3 of meringue with yolk batter with a rubber spatula. Then pour in balance of meringue. Fold gently to mix well.
  5. Pour batter into pan and tap pan lightly to remove air bubbles.
  6. Steam bake for 40 minutes at 160°C and bake for another 20 minutes at lower temperature 140°C.Remove cake immediately after baked and invert cake on wire rack to cool.

Sunday, 8 September 2013

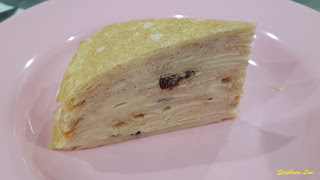
法式千层蛋糕 (Bailey Raisin Mille Crepe)


Bailey Raisin Mille Crepe (make 1 x 7” cake)
(original recipe source: http://nasilemaklover.blogspot.com/2011/03/mango-mille-crepe-fruity-march.html)

Ingredients (For the bailey raisin cream):
  • 300g non-dairy whipping cream
  • 3tbsp Bailey
  • 100g Raisin
Method:
  1. In a mixing bowl, beat whipping cream on high speed until thick and stiff.
  2. Add in the rest of ingredients, combine well and chill in the refrigerator.
Ingredients (For the crepes):
  • 3 eggs
  • 500ml full cream milk
  • 150g all purpose flour
  • 45g melted butter
Method:
  1. Lightly whisk eggs, add in milk and melted butter, sift in flour and combine well.
  2. Strain and cover with plastic wrap and refrigerate overnight, this allows the gluten in the flour a chance to relax.
  3. Place a 7-inch nonstick pan over low heat.
  4. Add a ladle of crepe batter and quickly tilt the pan to coat the entire surface evenly in a thin layer and pour the excess of batter.
  5. While cooking, trim off the excess crepe at the area where the batter was pour out.
  6. Cook only one side until golden (less than 1min) and remove crepe by lifting it by the edges.
  7. Continue cooking the rest of the crepes, stacking up the crepes as you work.
To assemble Mille Crepe:
  1. Using a spatula or pastry scraper, spread a thin layer of mango cream on the first crepe.
  2. Repeat the layers to make a stack of 20-22.
  3. Chill for overnight. Serve cold.